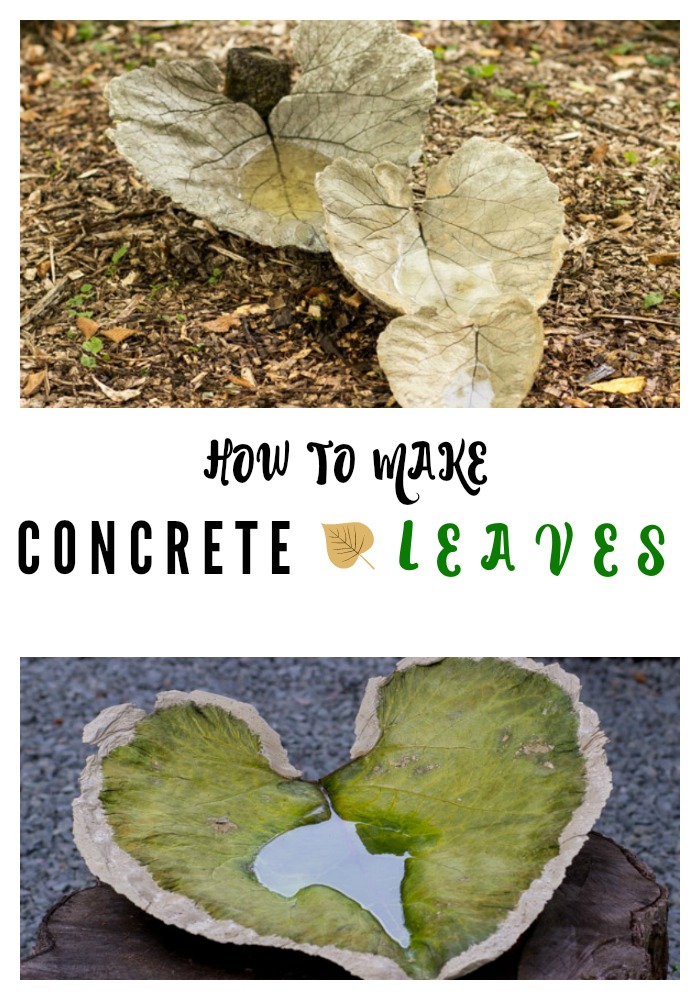
A few weeks ago I showed you the above concrete leaf, but I had a few kinks to work out so I didn’t include how I made it. Since then a few of you have expressed interest in the process, but before I begin here’s a disclaimer:
There are many ways to make concrete leaves. I looked at several videos on YouTube (two of them are at the end of this post) and found that while they were all helpful, none of them were all inclusive. There always seemed to be something important that was left out. For instance, one didn’t mention flattening the bottom of the leaf, so my first one ended up being wobbly. Another didn’t mention making the middle part thicker, which resulted in the end product breaking in half. By taking tips from each one, I was finally able to figure out the best process for me, but you might want to take a different approach.
One other thing. I know some of you reading are probably thinking there’s no way you would go through all this trouble. Let me assure you, it’s not a lot of trouble at all! It may seem that way because I’m going to go into a lot of detail which will make it seem more complicated than it really is, but the truth is, this is playtime for adults, and when you’re done, you’ll have a pretty cool garden accent that everyone will ooohhh and ahhhhh over, and who doesn’t love that??
Let’s get started…
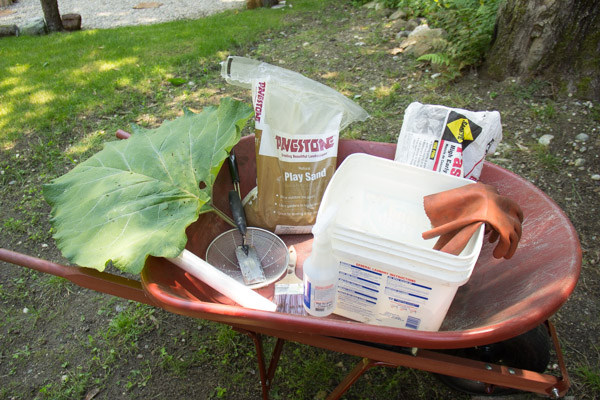
What you’ll need:
Concrete mix
Water
Saran Wrap (not shown)
Play Sand
Rubber Gloves
Mask (not shown)
Trowel for mixing
Old paint brush
Large container for mixing cement
Masking Tape (not shown)
Bottle of spray water (not shown)
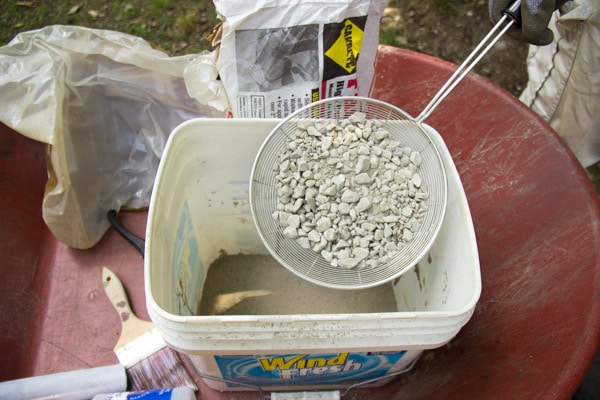
Strainer (depending on type of concrete and if you want aggregate in the final product)
Fresh picked leaf with good veining
Sealant (optional, not shown)
Scissors (not shown)
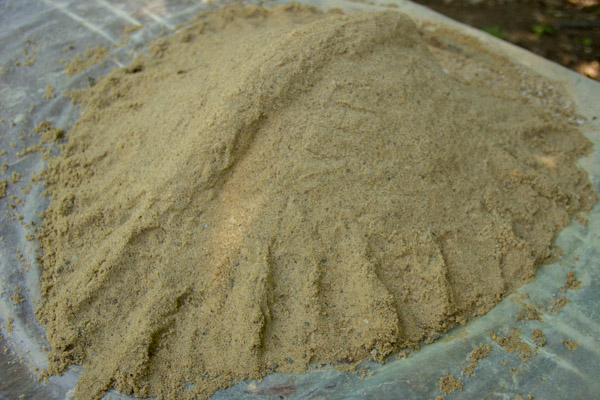
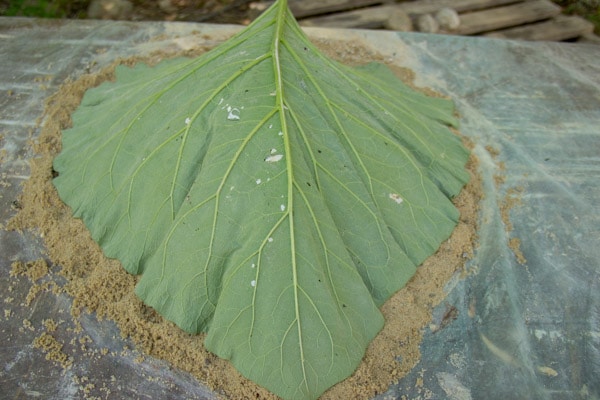
Get yourself a sturdy surface, preferable outside in a spot that is not too sunny. We used an old folding table and covered it with plastic. Next you’re going to want to make your ‘mold’ using your play sand. How large it ends up being will depend entirely on the size of the leaf, but if you end up making it larger than you need that’s ok. Just don’t make it smaller!
Using your container, channel your inner child and mix up the sand with a little bit of water, just enough to get it to do what you want, like when you made sand castles at the beach, and make yourself a mold that looks something like this next photo. Notice how I made some ‘bumps’ on the edges and along the spine? That’s what you want so you’ll have a leaf that ends up looking realistic.
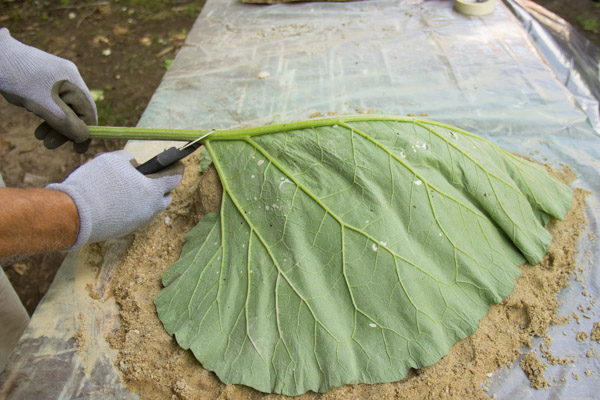
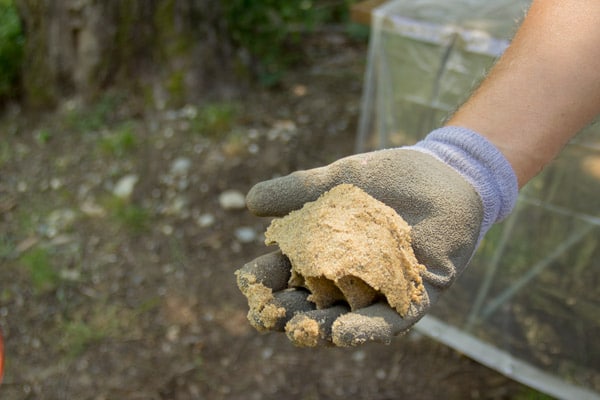
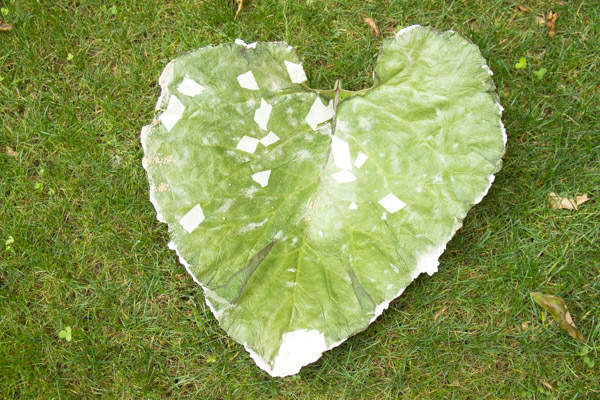
Now go get your leaf. Chances are, it will have holes in it so here’s where your masking tape comes in handy. Make sure you place the tape on the right side of the leaf, and don’t worry too much about covering up every itsy bitsy hole, just the larger ones should be fine.
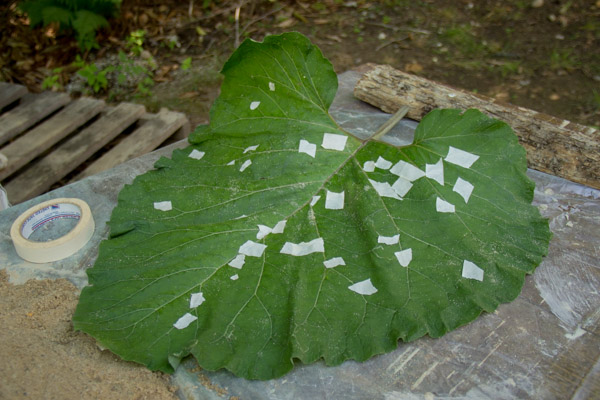
Now place your leaf right side down on the sand, positioning it as you’d like. If there’s sand on the leaf, now would be the time to gently remove it using your paint brush.
Using scissors or clippers, cut the stem close to the base as shown, then place saran wrap over the entire leaf.
my, what hairy arms I have!
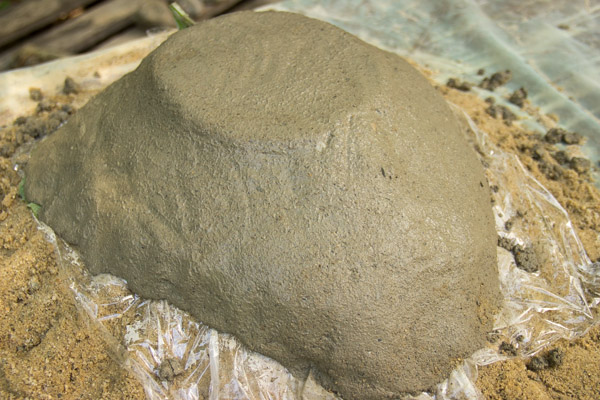
Now rinse out the container you mixed your sand in and get to work on your concrete. When we did this the first time, we used regular concrete which contains a lot of aggregate. Since I wanted the end result to be relatively smooth, we strained it, but this is optional. Subsequent leaves were made using portland cement which has little to no aggregate so we were able to skip the straining step.
Start by mixing your cement with less water than you think you’ll need, adding as you go.
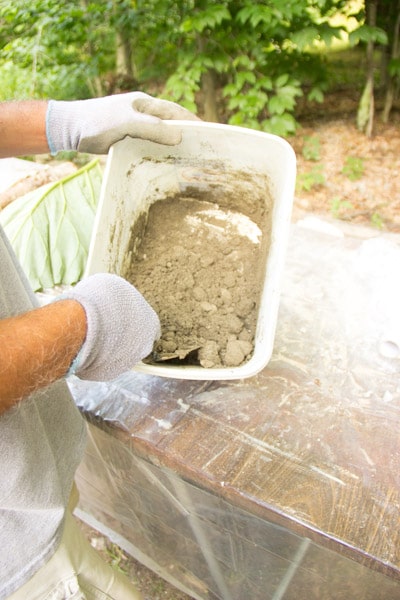
Your cement mix should hold its shape when squeezed with your hand, and not be too watery, like below.
Now just go ahead and plop the cement on the leaf, making the middle part thicker (I made it about 2″ but that’s probably overkill), tapering it a bit toward the ends to less than a half an inch. Make it thinner than that if you want a more delicate look. This doesn’t have to be exact at all, so don’t worry about it!
I brought the cement to just beyond the leaf’s edge, which resulted in the edges being a bit, ummmmm, uninteresting. If you have the patience, go ahead and bring it to meet the leaf exactly or even where you can see part of it so you will be assured of having veining throughout. Another option is to wait until it’s all done and using a chisel and hammer, chip away the edges you don’t want. That’s what I did.
Make sure you flatten the bottom a bit as shown so it won’t be wobbly when it’s on the ground.
Dampen your paint brush and smooth out the cement and cover it with saran wrap.
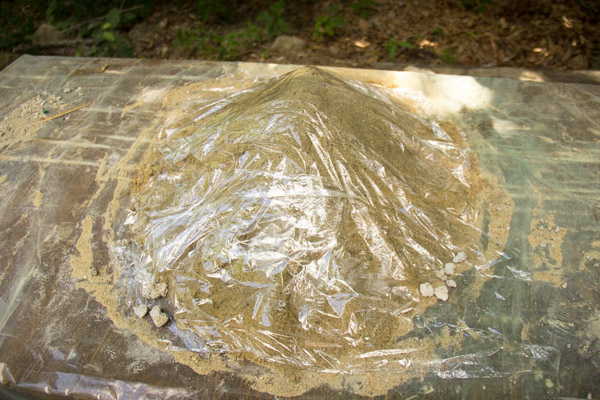
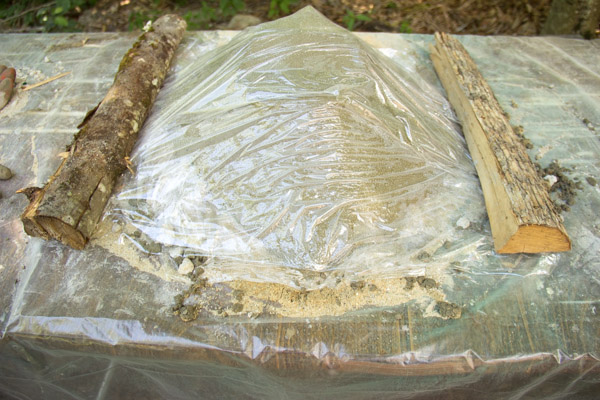
To prevent the wrap from blowing away, we secured it with some wood. Keep it in a shady spot and if rain is predicted, make certain it’s protected.
Spray it with water every few hours (or once or twice a day should be fine) for up to two days, then let it dry completely for another day. I actually wasn’t very good about keeping it spritzed regularly and it turned out ok, so if you can’t do this step don’t worry about it. By the third day it should be ready.
Pick it up by placing one hand underneath as best you can and while supporting it with the other, flip it over. This is what it will look like initially.
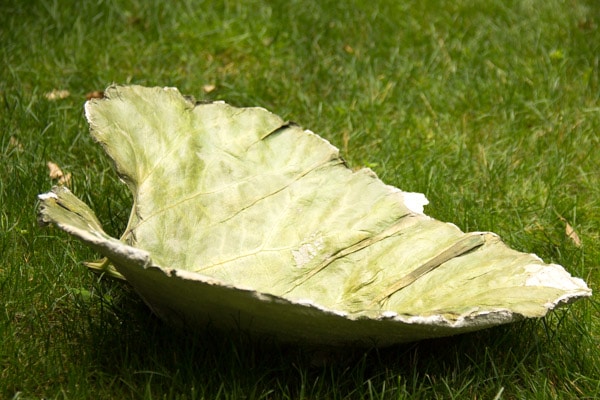
Remove the tape and as much of the leaf as you comfortably can for now. After a day or two the leaf starts to disintegrate and becomes easy to take off. You can use a wire brush to hurry the process along if you’d like, seal it with something like Thomson’s, and you’re done!
You might recall I mentioned I was planning on painting the leaves, so I asked a friend who is an artist to come over and help. She took one look at it and felt very strongly that it shouldn’t be painted, and I have to say after thinking about it I agree with her. We both think the natural look is best for the environment that it’s in.
If you do decide to paint yours, a delicate wash seems to look best in my opinion. You can get more info on that in one of the videos at the end of this post.
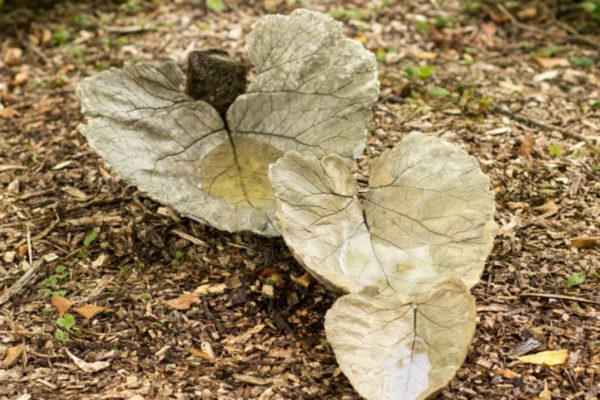
Here’s a tip that might convince you to give this a try: once you have the sand mold, you can use that over and over again. I’ve made five leaves so far using the same size mold, even though as you can see some of the leaves are smaller than the larger one.
Now here’s those videos I promised:
In this video, she talks a bit about cement coloring powder, which is always an option if you want some color but don’t want to paint.
This next video gives some examples of leaves that have been painted. You might also notice they don’t wet the sand. Like I said, lots of ways to do it, but I like the ability to manipulate the sand which is a lot easier when it’s damp.
In addition to the above, there are many, many other how-to videos you can find on YouTube that are worth watching. Just type in ‘cement leaves’ and you’ll see lots pop up.
In other news…
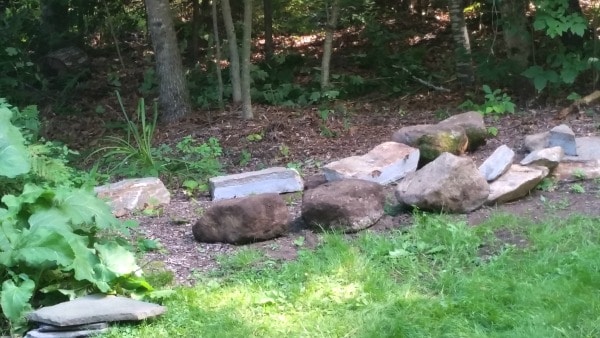
We’re gearing up to do the side yard, and spent the better part of the day digging up and moving some large rocks. All I can say is, thank goodness for our hand truck!
We just had the boys for a week and took them to a local KOA with BAM. We had lovely weather and enjoyed the resort, but unfortunately some of our items in the RV were missing. We keep it at the dealer where we bought it and it needed servicing, so we’re thinking one of the mechanics helped themselves. Nothing expensive or super important…just random stuff that we needed like hangers, pots and pans, sheets/pillowcases. Crazy!
Tomato season is in full swing, and every year around this time I like to make tomato sauce and either freeze or can it. I had a great crop of basil and was hoping to use it for just this purpose, but I waited too long to harvest it and when we returned from our RV trip they were all burnt. I did manage to do one batch a couple of weeks ago and I used a different method than the one I linked to.
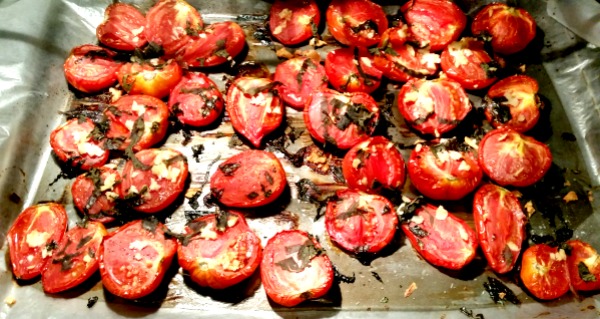
I just halved some plum tomatoes, put some olive oil, garlic, and salt on them and put them on a lined baking sheet in a 250° oven for about 3 hours. After the first two hours I added some fresh basil. Then I placed them in a blender and voila! Delish!
Hope you’re enjoying the end of summer! Till next time…
Sharing At
Cooking & Crafting


Wow.. it does seem like a long process.. but like you said… maybe it only “seems” that way! Those turned out so darling. Hum.m.m. wonder what else a person could mold out of cement??? I do like them natural too. Wonder if I could make my own bird bath… hum.m.m.m.m. was a really good tutorial too by the way. Sorry about someone having sticky fingers in your RV.. that’s weird. And don’t work too hard on that side yard! Yes… I can feel the end of summer in the air. Not quite ready yet, but it’ll happen when it good and feels like it!
Hey Doreen, I really love your garden leaves and I’m glad that you didn’t paint them too. I like the natural look!
I wonder if rhubarb leaves that might work for this application. They are the only big leaves I have around here.
So glad you had fun with your grands. We are meeting several of ours the first of October for one last hurrah before the snow begins to fly again. One four letter word I try not to think about! What a bummer that someone helped themselves to your camper supplies. Are you reporting them?
take care-kim
These turned out great, Doreen – I love how you painted them – so natural looking! Your tutorial gives me hope that I might be able to do this – thank you for all the tips and good advice. I love how easy the tomato sauce is – I’m going to try this! So nice to spend time with the grands. I am so sorry about the missing items – strange things to go missing – maybe you have provided someone in need, if there can be any good out of the situation! 🙁 xx Karen
Such a beautiful idea! I like it ♥
summerdaisycottage.blogspot.com
Great tutorial. I really like how yours are kind of bowl shaped. Pinned
hello dear bean!
it’s the resident sloth here.
they never accomplish anything. but they’re so danged cute.
except the resident in question cannot even claim cuteness!
howsoever…
I do love to watch other people’s accomplishments! and your leaves are just beautiful. when I saw the three in the picture together I though what a lovely fountain it would make. with the water pouring into each one.
and your homemade sauce!!! omgosh.
and… after the desecration!
I would keep BAM out of harm’s way in your own yard i’m thinking!
good grief charlie brown. XOXO♥
If you say so, Doreen. I probably will take your word for it. But, they are gorgeous! And you make your own tomato sauce? I did that once but I got over it.
That’s a shame that someone took these things from BAM. Golly, what’s this world coming to? But I bet the grands didn’t mind, maybe even added some mystery to the excursion.
This is just amazing, Doreen! The cement leaves remind me of the ever popular cabbage plates. I’d love to give this a shot, they would make pretty accents in the garden beds. Thanks.
Sorry about your RV…I never thought of a mechanic helping themselves to your stuff but from now on I’ll make sure I have nothing of any value in my car when I leave it to be serviced.
Your tomatoes look fantastic, I could eat them just like this on thick Italian bread!!
Happy Weekend!
Jane
That sauce sounds great, simple and super yummy! Love the concrete leaves!!
Doreen the concrete leaves turned out so beautiful. They almost look otherworldly. And their size really makes an impact. They look stunning in your yard.
My basil has burned too, only because I forgot to water it half the time in the summer. Oh well, there is always next year.
This is beyond cool. I’ve never heard of them and now I need some for my yard.
This was a great project! And I also like your idea to grill the tomatoes. I have plenty of cherry tomatoes this year!
You made this, wow! That is so cool, Doreen. I saw one in your previous post, and thought you bought it. : ) It does look like a process to do this project. I love how the water just sits in them. And homemade tomato sauce. Oh my, you are a talented gal. There’s nothing like homegrown tomatoes.
Have a wonderful week ahead, girlfriend.
~Sheri
Concrete leaves that will never wither or wilt or waste away – how clever (and courageous!) of you!
Too bad about BAM, but glad that you got to spend time with the grands.
Have a lovely week,
Poppy
Those leaves are beautiful and I don’t blame you for not painting them. They’re perfect just the way they are.
Your tomato sauce sounds delicious – now you’ve got my wheels turning. Might as well take advantage of all the wonderful tomatoes and fresh basil available right now and make some fresh sauce.
While I am not sure I’ll try this ( the concrete leaves ) it does look like something the son and DIL might try with the kids sometime, and it sure is interesting. I remember the first post about it and it was all new to me!
Sounds like great fun with the boys and not so much fun with the items going missing! Next time take some photos of everything that is in the RV prior to servicing and inform the owner of the place that you have done so and it all better be there after service!
LOVING tomato season here too 🙂
I love the concrete leaves…always wondered how hard they were to make. Thanks for the tutorial and tips! That’s really annoying about your things missing in BAM. Just wow. The tomatoes…yum! That recipe sounds delish!
Doreen, your leaves are stunning! I agree that the natural looks is great. I like the way you make tomato sauce! Yum!
Hi Doreen, your leaves are just so pretty and unique! What a process to make them.
Thanks for taking the time and sharing this at our Cooking and Crafting with J & J Link Up.
Enjoy the week.
Julie
Oh what a neat idea!!
I would love for you to share this with my Facebook Group for recipes, crafts, tips, and tricks: https://www.facebook.com/groups/pluckyrecipescraftstips/
Thanks for joining Cooking and Crafting with J & J!
Someday…..maybe….I’ll try the cement leaves. I actually bought one already made with a little frog on it at the Renaissance Faire ages ago and it is still in great condition. How could I top that?! I thought I was done working in the yard because I am so over it but then decided to take out my non-blooming hydrangeas. They don’t want to come out so now we have a huge project! The roasted tomatoes look so good. I have to do that!
Good Evening My Lovely Lady,
Well this is fabulous! I adore this idea, project and end results. They are lovely sculptures for the garden and they are spectacular!
Pinning-and then pinning again.
Glad you enjoyed the grands, I know that you are a fun Grandmother!
xoxo
Jemma
Those concrete leaves are just beautiful! I’m so impressed that you actually made yours. Thanks for sharing the tutorial. I probably won’t make one, but it’s interesting to see how it’s done. I love how they look with water in them.
Wow you truly knocked it out of the park, I am so impressed by the beauty you created with your leaves. I love oven roasted plum tomatoes. They are packed with flavor and add texture and interest in recipes. Not sun dried – a tad different. I appreciate your tips and tutorial, your efforts have rewarded you with a beautiful piece of art and I will keep my eyes, fingers and toes crossed when I try it I am successful.
Okay okay – you actually do make this sound doable. And I LOVE the natural look and so glad you didn’t paint them. Great job team (I saw those hairy man arms – Lord now I’m praying you guys worked on this together) and I love how they look grouped together like that with different sizes. I am impressed! 😉
Love the tomato sauce idea too! Yummy.
But I’m so ticked by the stolen stuff in your RV. Boo on them – and how ridiculous is that for such little things?? I will choose to think of it as they are poor and in true need of those items and you happily donated to them. There….now I feel better about YOUR RV.
Boy, am I weird.
Thanks for sharing more good stuff as always Doll! xoxo
OMG! Love the step by step instructions!
I’ve “pinned” this so I have it forever!
XOXOXO