I’ve been a bit frustrated with my food photos from time to time. I look at the beautiful, tempting food photos in magazines and Pinterest and wondered what the secret was. But it really isn’t a secret.
When it comes to photography, lighting is everything, and that’s never more true than in food photography. While some of my photos have been ok, more often than not they looked like this:

This picture was taken a little more than a year ago, just before I purchased a DSLR. While my current camera makes it a little easier to get good photos, it can’t compensate for poor lighting. If your lighting is poor, your pictures will be as well. In the above picture the lighting is flat and lacks depth, and it certainly doesn’t make you want to try this recipe. (In case I’m wrong and you do, you can find it here. It’s DELICIOUS!)
I did some research and quickly learned that a lightbox is single handledly the most important tool to help you achieve optimal light conditions and found a pretty good tutorial on how to make one. Unfortunately, the blog where I found the tutorial is closing soon but for now at least you can go here to get the precise details on how to make one if you think you’d like to give this project a try.
Professional food photographers use fancy, expensive lightboxes, that can easily cost upwards of $100, and if you’re a professional photographer that would be money well spent. But I’m not and it’s a safe bet I never will be.
But that doesn’t mean I don’t want my pictures to be the best they can, and I’m willing to bet you feel the same way.
With just a little bit of effort and not much expense, you can put together a lightbox that will improve your photos dramatically, and as an added bonus it won’t take up much space because when you’re done you just fold it up and it stores flat.
Here’s what you’ll need:
5 pieces of foam board (I used 24″ x 18″)
A Pencil
A Carpenter’s Square or Ruler and Measuring Tape
A Sharp Cutting Knife
A Cutting Mat
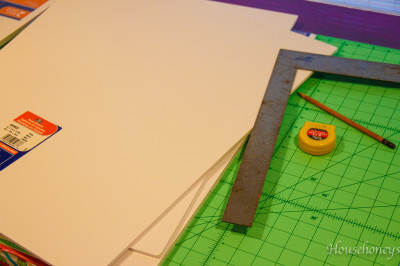
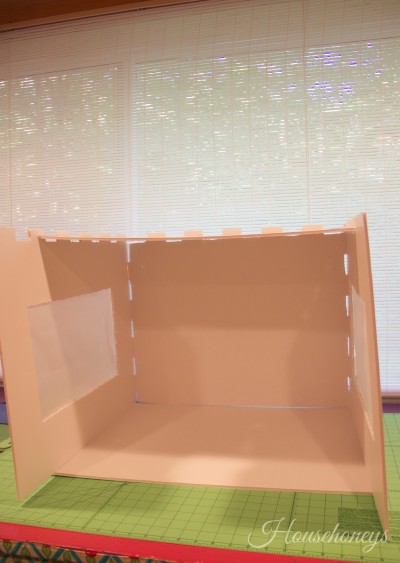
Get yourself a nice large surface and place the boards flat, marking each one board so you will know where it goes, i.e., Left, Right, Back, Top and Bottom. (These marks will ultimately face the outside of the lightbox, NOT the inside.) Put the bottom board away for now since it doesn’t need to be marked or modified in any way.
With your ruler mark your boards as shown below. The lines should be approximately 1 inch from the edges. I apologize for the small illustrations, but hopefully you can see that the one on the bottom left will be the left board, the one in the middle will be the back, the one on the right will be the right side of the box and the top illustration represents the top board. So in essence the top and back get lines on three sides while the left and right on two sides.
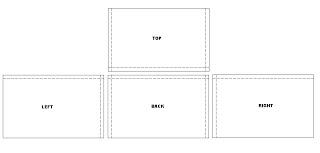
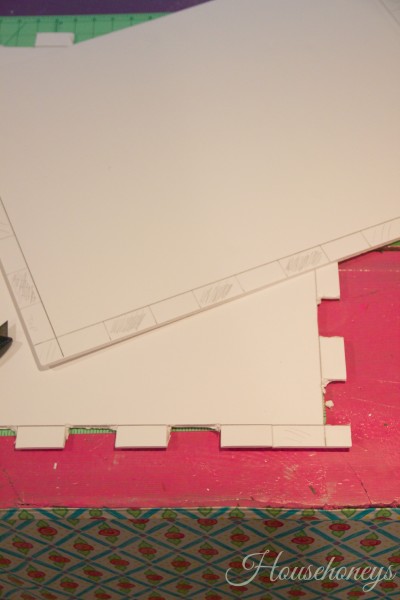
After you’re finished with your lines, in two inch increments, starting at the bottom or corner of each of the boards, make a mark and then shade every other ‘box’ as shown. Next, you should cut out the shaded notches. If you haven’t figured it out yet, you’re basically making a puzzle.
Although the tutorial I followed was a good one, it wasn’t perfect and to help make your lives a little easier, I strongly suggest you make certain the notches are as they should be with each step. In other words, after you cut out the notches on your first board, make sure BEFORE you cut your second that the notches will line up with it.
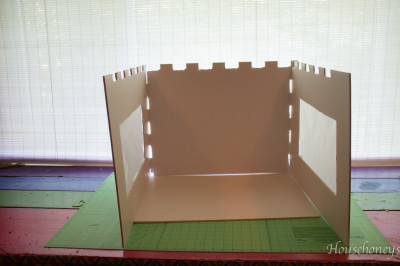
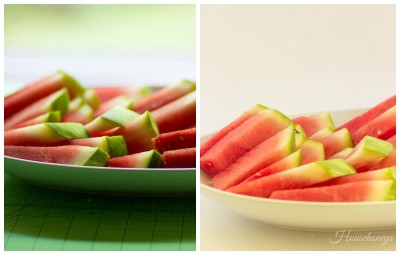
The box will look something like this when you’re done. In case you’re wondering, I decided to cut out the sides and taped some vellum to allow for more light to come in. This is totally optional. Notice the shadows? That’s exactly what you DON’T want! I didn’t have portable lights to shine into the box which would have helped tremendously with this issue so I got creative and removed the top, turned off the lights and changed the settings on my camera to compensate and I was good to go.
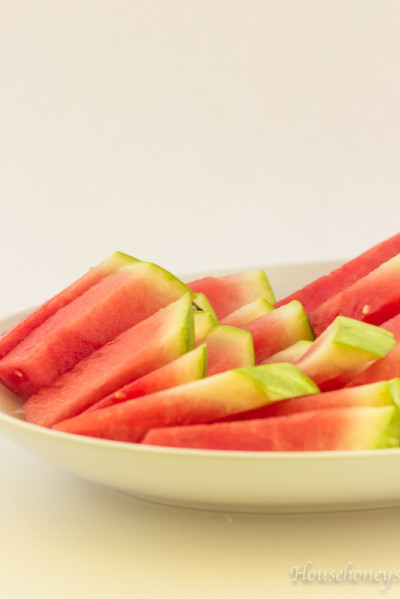
Here’s a photo taken without the lightbox.
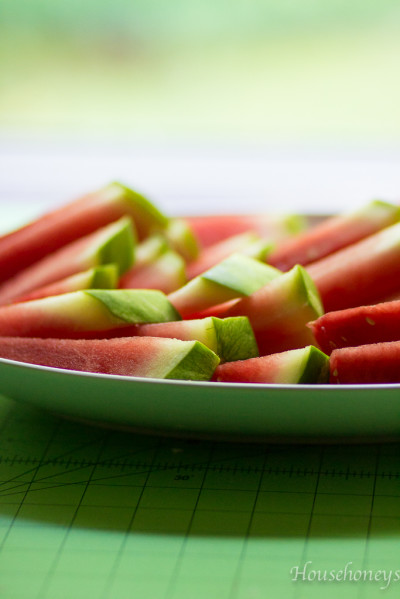
And here’s a photo with it using the same lighting conditions, same camera settings and same post processing edits. Pretty impressive, right?
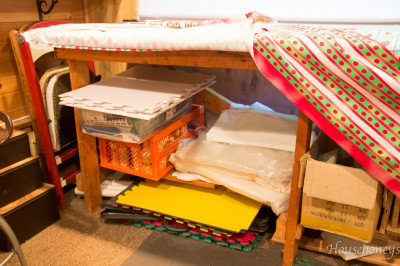
And here’s the lightbox being stored under my work table, and yes, I know it’s a mess. That’s why I cover it when not in use ;).
You don’t necessarily need a lightbox just for photos of food. It would work nicely for small craft projects too! If you’re in the business of selling items like jewelry and you have an Etsy shop, this would come in super handy!
Now that we’ve gotten that out of the way, how was your holiday weekend? Did you have good weather? We are starting the process of looking for RV’s and saw one we liked but we’re not ready to pull the trigger yet. On the 4th we went to Tanglewood to see James Taylor. It had been raining all day so we weren’t able to picnic on the grounds as planned, and they cancelled the fireworks which was disappointing, but he was great. At 66, he still sounds just like he did when he was 25.
Today and yesterday we had beautiful weather and took advantage of it. We saw an outdoor concert with a large lake as the backdrop and it was beautiful! I rarely take my camera when we go anywhere. I figure I can use my cell phone, but one of the bad things that happened was my cell phone got wet and died. I tried keeping it in rice but it didn’t work, so we’re off to get a new phone tomorrow. I’ve been wanting to get an iPhone for a while. I have a Samsung Android and can’t say I’m a fan and luckily my phone is insured so it’s time for an upgrade :).
Not sure if you’ve noticed but I’m posting less these days. Once a week seems to be a good pace for me, at least for now. I want to enjoy the weather and not spend my time in front of a keyboard. How often do you post? Whatever it is, would you like to post more or less? Do you slow things down a bit in the summer?


I’ve been wanting to make a lightbox but am super intimidated by the thought of it. Yours looks doable so I’m pinning this for later.
Hi Doreen,
You have so many smart solutions to all our, (bloggers, that is), problems! Yes, this looks quite straightforward to assemble and the effects are evident; great photo!!
I enjoy creating posts, connecting with everyone and learning new things, and since it’s pretty quiet around here for the time being, (we’re expecting several visitors this summer), I have more time to blog and I’m posting about twice a week, on average, BUT, I’d rather be on the beach, in the pool, or touring the island, which also allows for more great photo opportunities! Also, it’s extremely hot for most of the day, and I usually venture out into the garden either early morning or late afternoon, to do some pruning and watering.
Good luck with your new purchases and have a wonderful week!
Poppy
I must make one! And this one seems easy and practical! I am making it and adding a link back to you from my blog! Thank you!
Excellent tips, Doreen! It’s amazing how much better images look when using a lightbox. 🙂
Thank you for this tutorial! I do have an Etsy jewelry shop and have been thinking about making one for some time. Will definitely give it a try now!
I need to remember this if I ever get around to opening my Etsy! Fabulous idea making it collapsible. Thanks for the tutorial! Have a wonderful week…:)
Blessings, Vicky
First of all, I’m so jealous that you saw James Taylor! I love him! I’m going to Carolina in my mind – oops – I’m already there! 🙂
I have a lightbox, but I rarely use it because I’m too lazy I guess. I do take most of my photos outside in the shade. I’ve been know to take pics between rain storms and in the freezing cold.
You’ve made me want to practice with my lightbox! Great post and tutorial!
PS – I had an Android and have had an iPhone for a while now! I love, love, love my iPhone. The hubs loves his Android. Oh, well.
Lastly, I’m beginning to slow down on the posting, too. I found myself posting 5 times a week (up from my usual 3) and I’m ready to slow things down . . . I think. Hope you are having a great summer!!
Hi Ali! I actually ended up getting the Samsung 5, much to my chagrin :/. I basically didn’t have a choice because since my phone died, the tech said I wouldn’t have been able to transfer my data to an iPhone. I’m hopeful the quirks with the previous phone have been worked out and I’ll end up liking it.
I don’t know if I could ever post five times a week and still stay sane ;). Kudos to you for doing it and doing it so well!
Guess what I’m making tomorrow??? A light box!!! This is awesome!!! Glad your weekend was good…..I love James Taylor, have never seen him….maybe one day! Hurry up and buy that RV so you can come here!!~~Ang
Great post Doreen! What a difference in the before and after pictures.
Hope you are doing well!
Alison
Yes…super cool!…Will be referencing this post to make my own!…Thanks Doreen!!!
My pleasure Shirley! Enjoy Haven!
Thank you for this tutorial, Doreen. I really, really need to try one of these for some of my photos. The lighting on my pictures is atrocious, lol. Pinning, of course, by the way.
I’m trying to post 2 times a week and stay committed to that, aside from holiday weeks. With a full time job, I can’t seem to do any more at this point.
James Taylor is one of my favorites. That had to be a blast to seem him even at 66.
I’ve heard good things about the Samsung 5. I hope your works out for you and would love to hear how you like it after using it a while.
Have a great night -Amy
Great idea… and your beautiful photos show it!
Very nice tutorial! 🙂 Must have been wonderful to hear James Taylor. I loved him, Carole King, and Crosby Stills Nash and Young the most when I was young. I remember laying on my grandparents couch with the album cover ( you’ve got a friend..that one ) singing along and memorizing every word.
My poor grandparents, lol! 🙂
Great photo! I like that you don’t get the shadow with the lightbox. I haven’t made a lightbox yet. I usually use one white foam core for the whatever to sit on and then one behind it. I’ll have to try the box method – I imagine the light bounces off the sides.