Several months ago I received more ribbons than I knew what to do with…FREE! I was looking through a craft book last week and came across this idea of making a small bag out of ribbons and I thought I would give it a try. Now, I ask you, have you ever tried to make something and no matter how hard you tried, the directions just didn’t make sense? That’s what happened to me, and let me tell you, it wasn’t me. It was definitely the directions. But I persevered and the end result was worth it.
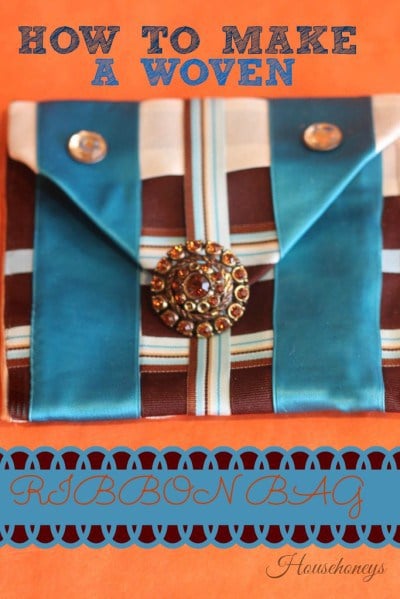
This little bag is the perfect size to keep small items organized in your purse, or you can use it as a gift bag to wrap a piece of jewelry. If you decide to give this project a try, you will need the following:
- Scissors
- 1/4 yard of lightweight fusible interfacing
- Pins
- Cardboard
- About 9 yards of ribbon, 1/4 to 1 1/2 inches wide
- Iron
- 7×17 inch piece of lining fabric
- Snap
- Thread to match ribbons
- Decorative button (optional)
1 – Cut a 7×17 inch piece of interfacing. Pin the interfacing, fusible side up, to the cardboard (I used a lightweight piece of poster board)
2 – Cut enough 17″ long ribbons to cover the interfacing. Pin the ribbons side by side along the interfacing.
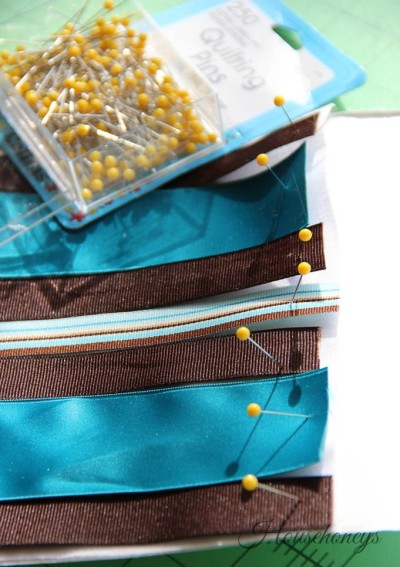
4 – Begin weaving the short ribbons with the ribbons already pinned to the cardboard. Pin the ribbon ends as the weaving is completed.
5 – Using an iron, fuse the ribbons to the interfacing removing the pins as you go and trim the edges if needed.
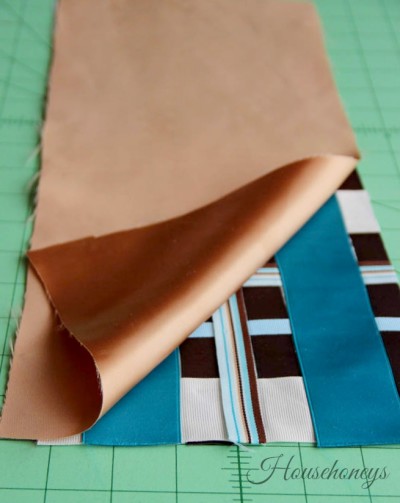
6 – Place the lining fabric atop the woven ribbon piece, right sides together. Stitch together using a 1/4 inch seam allowance and leaving one short end open. Trim the seams and turn.
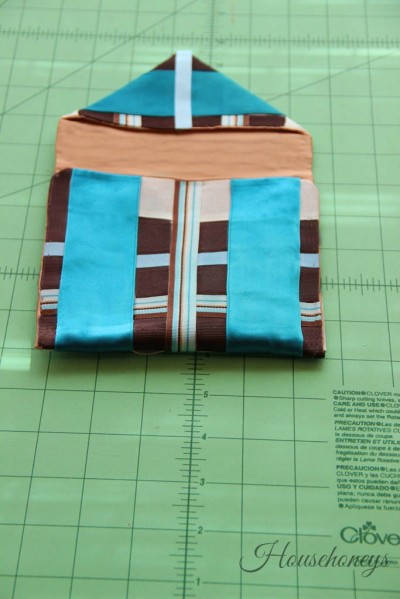
7 – Measure 6 1/2 inches from the stitched short end. Fold the woven piece at this point with the right sides facing. Hand stitch both side seams using a slip stitch, or, if your ribbons are similar in color and you won’t mind if the stiching shows, just use your sewing machine and make a 1/4 inch seam. Turn right side out.
At this point you need to make your flap and this is where the directions got really funky, so I’m not even going to go there with you. I’m just going to tell you what I did.
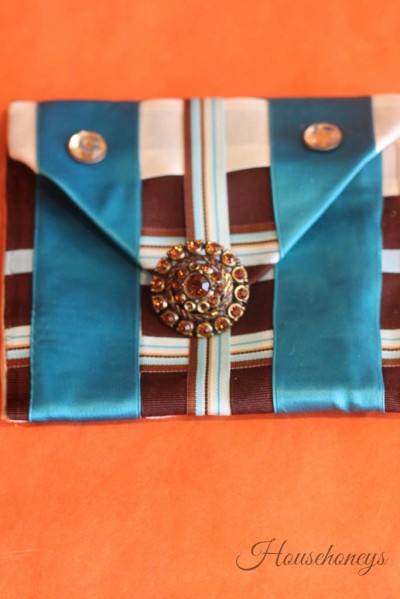
Take the raw edges of the short end and bring them together to form a ‘V’. Iron, then get yourself one of your ribbons and some fusible tape in an appropriate size (mine was 1/4″) and fuse the ribbon onto that raw edge. You see that little light blue ribbon in the middle of the ‘V’? That’s covering a raw edge that shouldn’t have been there in the first place!
8 – Sew on a snap closure where the flap point meets the bag and sew on a decorative button to the point if desired.
I decided to embellish the bag with a couple of blingy buttons, but that’s completely optional. Basically, this is nothing more than an envelope pillow in miniature, so if I decide to make another woven ribbon bag, I’m going to follow a different set of instructions that I found in one of my sewing books. I just Googled ‘envelope pillow covers’ and all I got were instructions on how to do a pillow like my ‘Grandma’s Easiest Envelope Pillows‘, but of course those don’t have that ‘V’ shape and won’t get you the results you need.
I was so frustrated with the instructions in the book that I spent about 30 minutes trying to see if the designer (her name was in the back of the book) was on Facebook or Twitter (nada) because I wanted to ask her about them. Fisherman tried to figure it out too to no avail, so I know it’s not me. There’s no way you’re supposed to end up with a raw edge on a finished product! Everyone knows misery loves company, so I have to ask, what’s YOUR most frustrating diy/craft moment?
(I guess I made lemonade out of lemons, because it looks pretty cute anyway. If I make another one using the other method, I’ll weigh in and let you know which I prefer.)
Sharing At
Tweak It Tuesday


How beautiful Doreen…I love the colors and the pretty broach!!!…Great job!!!
Doreen, it is very cute! I don’t know if I would of had the patience to stick with it! Yikes, I hate bad instructions.
Very cute! You have the patience of a saint. LOL!! It turned out beautiful and I love the brooch! You are so talented!!~~Angela
This looks way beyond my capabilities. I think if I tried this it would end up looking like a diaper. Or smelling like one. But yours is lovely.
-andi
It looks lovely in the end! You were rewarded of your patience!
Since I am not an expert at sewing I ALWAYS think IT IS ME! However, last year making a pillow cover and following the instructions…from a blog….didn’t work and yes I wanted to scream because I thought it WAS ME! In the end I adjusted it all, emailed the blogger and yes her measurements were off a bit.
THEN I tried to make a doll according to a template in Mollie Makes. LONG story but again in the end it was not ME!! They had not enlarged the pattern or something and the designer apologized when I got ahold of her and promised to send the correct template. A month or so later she remembered.
BACK TO QUILTING! NO MORE DOLLS and NO MORE MOLLIE MAKES, LOL !! I don’t trust the testers! 🙂
There are few things more frustrating than spending hours on something that doesn’t have a chance of working because the instructions are wrong! Ugh! Fortunately it’s the exception rather than the rule, so we persevere :). Or maybe we are just masochists. Lol
I have always loved blue and brown together, something simultaneously calming but energetic about this colour combination! Your bag turned out quite lovely, as most things do when created with patience and persistence! Very pretty!
Poppy
Thanks for your honesty. I love making projects for my grandchildren, their dolls, and their parents. Rarely does anything turn out the “way” I anticipated. I have therefore decided to give myself “editorial rights” and the projects now go to the person that it fits and wants it. Sometimes it is first come first served…
This way I do not loose precious crafting time trying to figure out something that is not there. I guess I have finally learned to use coping mechanisms over perfection.
If you make things for dolls (clothing?) you must be very talented and patient! I’ve always felt it’s much harder to make small items than large, as there is more detail involved and less room for error.
Perfection is an unworthy goal. It just leads to frustration and disappointment. Excellence is far better and achievable. I’m sure your family finds your creations beautiful, for they are made with love and care it seems.
Thank you for stopping by Jan. I hope you will visit often!